Mixing Basics
This page covers day-to-day mixing. For each control's exact range and interactions, see the Controls Reference.
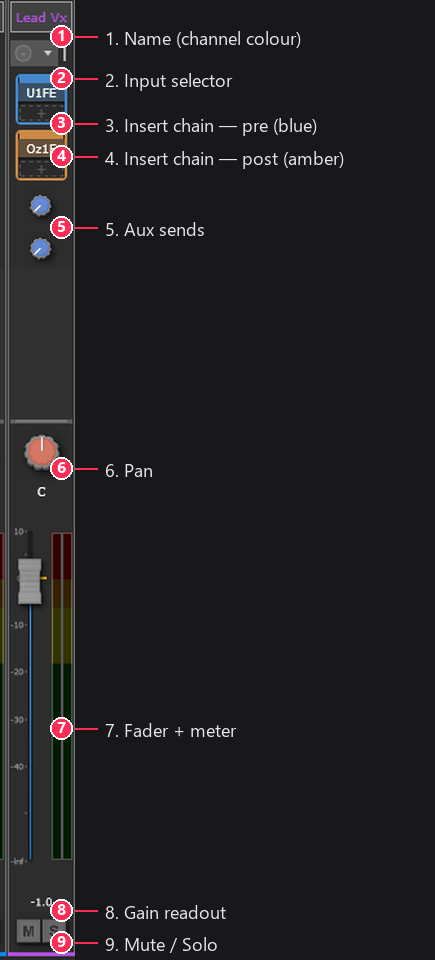
Mixers and channels
A mixer is a self-contained set of channels plus a main bus. You can have
several mixers in a session and switch between them from the sidebar or with
Alt+1…0.
- Add a channel: Mixer > New Channel (mono) or New Stereo Channel.
- Aux channels: Mixer > New Aux Channel: effects-return/sub-mix channels (mute-only, no solo).
- Select a channel by clicking its strip; Ctrl-click to add to the selection, Shift-click for a range. Many keyboard actions apply to the whole selection.
- Rename: double-click the name, or select and press
F2. - Renumber: right-click a channel and choose Renumber Channels... to rename
channels in order from a prefix (for example
Vox 1, Vox 2, ...). It applies to the current selection if you have one, otherwise to every channel in the mixer; a singleCtrl+Zreverts the whole batch. You can set a start number, zero-padding, and the separator. - Reorder: drag a strip left/right.
- Colour / delete: right-click the strip. Deletes are immediate and
undoable (
Ctrl+Z).
Setting a level
Drag the fader (−∞ to +10 dB). Ctrl-click for unity (0 dB), Shift-drag for
fine control, or double-click the value to type. With channels selected you can
also use 0 (unity) and - / + (∓1 dB).
The meter beside the fader shows output level in dBFS with peak, RMS, and a peak-hold line.
Pan
The pan knob positions the channel left to right. Ctrl-click to centre,
Shift-drag for fine control, or double-click the value to type (L50, C, R30).
Mute and solo
- M mutes the channel (silences it).
- S solos the channel: while any channel is soloed, every non-soloed channel is silenced, so you hear only what's soloed. Soloing does not change the other channels' mute buttons.
- Ctrl-click a mute (or solo) to clear all mutes (or solos) in the mixer.
Aux sends
Each channel can send to aux channels at an independent level. On an aux send:
- Drag to set the send level.
- Shift-click switches pre/post-fader (knob turns blue/yellow).
- Alt-click enables/disables the send (grey = disabled).
Use aux sends for headphone mixes, reverb/effects returns, or sub-mixes.
Inserts (plugins)
Channels and the main bus each have two insert chains for VST3 plugins: a pre-fader chain (blue border) and a post-fader chain (amber border). The signal flows:
source → pre-fader inserts → fader → post-fader inserts → output
so pre-fader plugins process the signal before the level fader and post-fader plugins after it. Each chain is drawn inside its colour-coded border as a list of slots, with these interactions:
- Add a plugin: click the empty dashed
+slot at the end of the chain to open the plugin picker. There is always one empty slot, so there is always somewhere to add. - Open a plugin's editor: click its slot.
- Bypass one plugin: click that slot's
Bbutton (it lights when bypassed). - Bypass the whole chain: click the thick top border of the chain. The border dims and the slots grey out while the chain is bypassed.
- Remove a plugin (and more): right-click its slot for the menu.
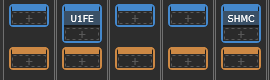
Plugins are scanned by a separate helper process, so a faulty plugin can't crash the Console. If a plugin fails to load you'll get a non-modal error toast.
The main bus
Each mixer sums its channels to a main bus with its own fader, meter, mute, and insert chains. The main bus is what the mixer sends on to your hardware output or another destination, see Routing.
